Super network tunnel client/server for X86/X64 Linux How To
Different
Can communicate with windows/ Linux client,
different with the windows version server is Linux server have not a built-in
FTP server,this is because Linux already have a file transfer server, so if you
want to access the Linux server files,you can manually add SCP or FTP client to
client's tunnel, then use 127.0.0.2 IP address in FTP client to access server's
file system.
Requirements
Glibc 2.0 or above
libgconv.so
100M disk space
128M memory or above
X86/X64 version Linux
If you install at pure
64 bit Linux, please check your Linux version have installed 32 bit program
runtime library, if not, please install 32 bit program runtime package (such as
libc6-i386/ia32-libs
for ubuntu amd X64, step is 1.sudo apt-get install libstdc++6 2.sudo apt-get
install ia32-libs, Cent OS please use yum install glibc.i686 glibc-devel.i686).
Server Install
Just tar zxvf snt.tar.gz
Can install as root users (if you
want SNT server listen at 80/443 port, you need install as root users) or other
users.
Such as install as root.
cd /home/root/
tar zxvf snt.tar.gz
If you want to SNT server started with system, add some script at /etc/rc.d/rc.local
(for redhat linux)
vi /erc/rc.d/rc.local
Server Component
Start and stop services shell scripts (startsnt.sh
and stopsnt.sh)
Server configuration file (tunnelserver.ini)
Server configuration tool (snttool)
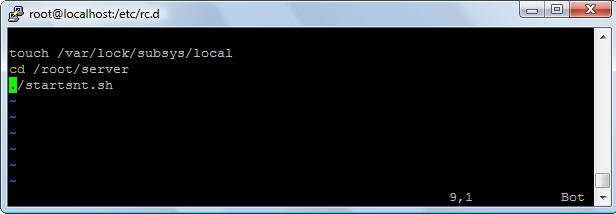
Start super network tunnel linux (SNT) server:
Use startsnt.sh to start SNT, if you want to SNT listen
at port 80 and 443, you must have root user privileges, otherwise only listen at
the port more than 1024. SNT server run as daemon process.
Stop super network tunnel linux (SNT) server:
Use stopsnt.sh to start SNT.
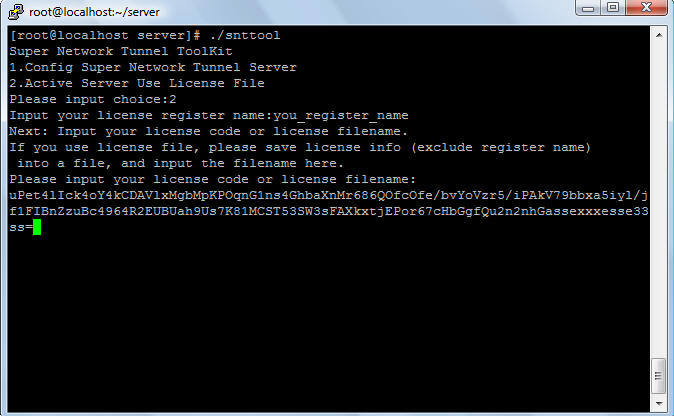
Register Server
After you purchase a license, you can use
snttool to active SNT server.
In the prompt window, direct enter the registered user name and
registration code (copy and paste it), or saved registration code to a file, such as license.txt
(not need registered user name), and in the registration window, enter the file
name license.txt.
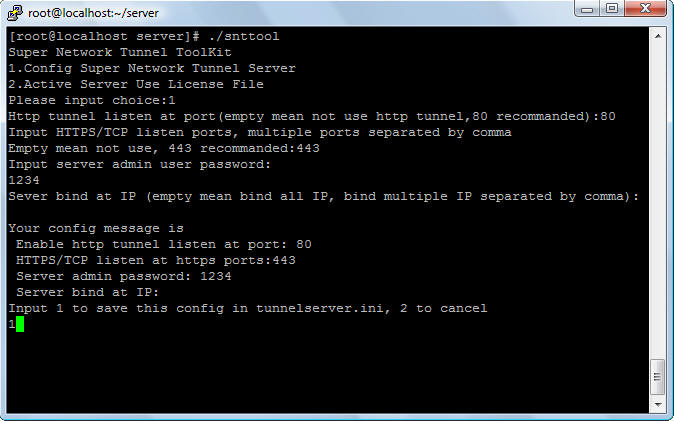
Server Configure
(1) Use snttool to create the basic
configure, include HTTPS listen port, http tunnel listen port, admin user
password etc.
such as
(2) Use startsnt.sh start super network
tunnel server.
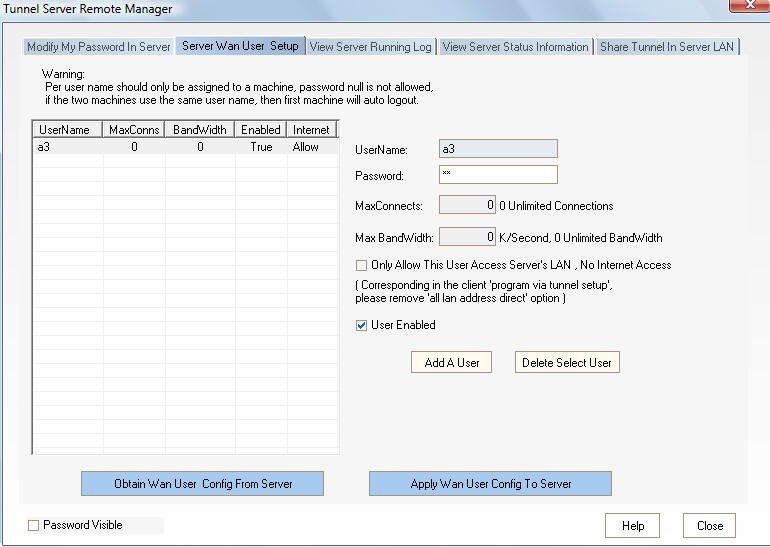
(3) Use windows version client connect to server, click 'Setup'->'Remote
Manager Server' menu, remote add server WAN users and server local LAN share
users.
(4) If you need additional configuration,
you can directly modify the tunnelserver.ini file, and then restart the server.
Configuration file tunnelserver.ini describe.
[server_users]
#Server WAN users config, use windows version client remote config.
user_list=dHVubmVsdXNlcwEAAAAGAAAAAgAAAGExAgAAAGExAAAAAAAAAAABAQIAAABhMgQAAABhMTI0JgIAAAAAAAABAAIAAABhMwIAAABhMwAAAAAAAAAAAQACAAAAYTUCAAAAYTUAAAAAAAAAAAEAAgAAAGE2AgAAAGE2AAAAAAAAAAABAQIAAABhNwIAAABhNwAAAAAAAAAAAQA=
[client_users]
#LAN share users config, use windows version client remote config.
allowip=
denyip=
user_list=
enabled=1
[server]
ports=MTEwDQo0NDMNCg==
#listen HTTPS ports, use snttool to configure
httptunnelport=80
#listen HTTP tunnel port, use snttool to configure
enablehttptunnel=1
#enable http tunnel, 1 enable 0 disable
password=eAEzNDIGAAEtAJc=
#server admin user password, use sntttool to configure.
listenip=
#Server bind at local IP addesses, multiple IP use comma separate, empty mean
bind at any IP.
#Note: Server bind port use so_reuseaddr option, so if you have other server
(also use so_reuseaddr option) listen on same port, it can also working in this
case.
#Such as, you have a router device, first start a http server (listen only at
LAN address 80, use so_reuseaddr option) for remote configure.
#Next install SNT server at your router device, then start SNT server (listen at
any IP address 80) after http server started (Add it at /etc/rc.d/rc.local).
#If LAN user access device port 80, use LAN address, it will access router
remote configure website, if WAN user access device port 80, use WAN address,
and it will access SNT server 80 port.
#Another way is to use Apache reverse proxy module.
logtodisk=0
#Log connect log to disk, format is yyyymmdd.log, 1 enable 0 disable
acceptip=
#Only accept these IP address connect to server, support , and *, such as
122.1.5.*,122.1.6.*, empty mean allow all.
debugdata=0
#Log detail transfer packet data into log file, 1 enable 0 disable
allowclientmodifypwd=1
#Allow client remote manager his password, 1 enable 0 disable, default is 0
maxconcurrentthreads=400
#max concurrent threads for https connect, default 400, recommend to 400
[dial]
updatedns=1
#If your server internet ip is not static, suggest you request a free second
level domain name for server ip,
#then your config the below option,you can see help file for detail. Server can
automatically updates your dynamic IP address every time it changes on one
dynamic DNS services .
# This allows you client connect to the servers running on your own computer
using a fully qualified domain name (e.g. myhost.dyndns.org, where myhost is a
name of your choice). Since your host name never changes it makes accessing your
servers much easier than using your IP address which changes each time you
reconnect. This is also useful when you want to remotely control your PC.
# 1 autoupdate it 0 disable
updatedata=https://nic.ChangeIP.com/nic/update?u=your_accountname&p=your_password&hostname=your_domainname
# dns update data
[portmaping]
portrules=MjIyPTIyMi4yLjEuMjozMzMz
#server port map rules, format is base64(port=dest_machine_hostname:port)
Some skills
If you do not know how to create
tunnelserver.ini file, you can use the windows version of the SNT server UI to
config it, when configuration completed, copy tunnelserver.ini to the
corresponding directory.
Super Network Tunnel Client Command LINUX
SDK is free, but requires you to have a registered version of the SNT server
to publish, if you do not have a registered version of the snt server, you can
not integrate this into your program.
In this time, you can use client portable version to launch client, client
configure file is tunnelclient.ini,
Client command SDK release file list is:
tunnelclientservice_portable.exe (linux version is sntclient_linux)
tunnelclient.ini
Run command is
tunnelclientservice_portable.exe portable.(use default configuration in
tunnelclient.ini)
Or
tunnelclientservice_portable.exe portable -clientpwd="new_client_password"
-proxypwd="new_proxy_password" -proxyusername="new_proxy_username"
-proxydomain="new_proxy_domain"
(These parameters are optional and will instead of use old param value
stored in the tunnelclient.ini)
Or
tunnelclientservice_portable.exe portable -clientpwd="new_client_password"
-proxypwd="new_proxy_password" -test
(-test param mean just a test then exit, if connect success, exitcode=0
and write command out 'success'
else exitcode=1 and write error message command out)
TunnelClient.ini configuration describe
Warning: The ini use ansi string format, if you original string is
unicode or UTF8 format (such as chinese/japanese username, domain name),
you should convert it to ansi string format or just use it as command
line param.(such as use WideCharToMultiByte function)
[dest]
ip=127.0.0.1 #server ip or hostname
port=80 #server port
username= #server username
password=aabcde #server encrypt password, can use command param -clientpwd="new_client_password"
to use custom client's password
usecompress=1 #1 use compress
usessl=1 #1 use encrypt
usesocks=1 #1 use a proxy connect to server, 0 direct connect
[server]
debugdata=0 #1 log debug log file
logtodisk=0 #1 write log file
allowserveraccess=1 #1 allow server access client LAN, 0 deny
startftpserver=1 #1 start ftp server, 0 deny
[socks]
item=1 #proxy type, 0 use http connect to server, 1 use http tunnel, 2 socks4a,
3 socks4, 4 socks5
username= #proxy username, ansi string format
password=eAEDAAAAE= #proxy password, can use command line param -proxypwd="new_proxy_password"
to use custom new client's proxy password
host= #proxy host
port=6005 #proxy host port
domainname= #NTLM proxy domain name, if not null use NTLM, only for proxy type
http CONNECT/http tunnel, ansi string format
ntlmver=1 #0 ntlmv1 1 ntlmv2
addsocks5port=18888 # your client listen socks5 port
useragent=Mozilla/4.0 (compatible; MSIE 8.0; Win32) #http tunnel user agent
addsock5bindip=127.0.0.1 #your client socks5 bind IP address
[portmaping]
portrules=base64(local port=mapping remote IP:port)
The call step is
(1) Use your program config tunnelclient.ini, or can use
tunnelclient_runasadmin.exe to create it at first time.
(2) Run tunnelclienservice_portable.exe portable -clientpwd="new_client_password"
-proxypwd="new_proxy_password" to launch command SDK or use
tunnelclienservice_portable.exe portable to launch command.
Such as use CreateProcess function and dwCreationFlags set to CREATE_NO_WINDOW
(3) Wait local socks5 port ready (check local socks5 listen port) or capture
client command line output, the prompt is "Connect to tunnel server success" or
"Connect to tunnel server fail".
(4) Make your program use local socks5 proxy (support UDP) or the TCP/UDP port
mapping to connect to remote server network via tunnel.
(5) When your program quit, terminate tunnelclienservice_portable.exe process.
Optional step is use -test param do a connect test.
Some skills:
If you do not know how to create tunnelclient.ini file, you can use the
windows version of the SNT client UI to config it,
when configuration completed, copy tunnelclient.ini to the corresponding
directory (including the linux version of the SDK can be used this way).